


 Let's begin with a single slit of width a, illuminated by collimated
light. At an angle θ = 0, all the wavelets from a wavefront are brought
together at the focal point F, and the total amplitude may be denoted by
Ro, and the intensity will be Io = Ro2.
At an angle θ, wavelets from the bottom of the slit will travel an
extra distance a sin θ with respect to those from the top. This
corresponds to a phase difference of 2β = 2πa sin θ/&lambda. The
plot of the resultant amplitude as we go from top to bottom of the slit
will be a circular arc, subtending an angle of 2β, and of total length Ro.
The vibration curve is a circle, because the phase difference is
proportional to the length of the curve, as in s = rθ. If R is the
length of the chord, the resultant amplitude for the whole slit, and r
is the radius of the arc, then R = 2r sin β. However, Ro = rβ, so r can be eliminated and we find R = Ro(sin β/β) or R = Rosinc β. This is the single-slit Fraunhofer diffraction pattern.
As a becomes comparable to the wavelength, the diffracted light is
distributed in a broad cone. The first minimum of R occurs when the
vibration arc closes into a circle, at β = π.
Let's begin with a single slit of width a, illuminated by collimated
light. At an angle θ = 0, all the wavelets from a wavefront are brought
together at the focal point F, and the total amplitude may be denoted by
Ro, and the intensity will be Io = Ro2.
At an angle θ, wavelets from the bottom of the slit will travel an
extra distance a sin θ with respect to those from the top. This
corresponds to a phase difference of 2β = 2πa sin θ/&lambda. The
plot of the resultant amplitude as we go from top to bottom of the slit
will be a circular arc, subtending an angle of 2β, and of total length Ro.
The vibration curve is a circle, because the phase difference is
proportional to the length of the curve, as in s = rθ. If R is the
length of the chord, the resultant amplitude for the whole slit, and r
is the radius of the arc, then R = 2r sin β. However, Ro = rβ, so r can be eliminated and we find R = Ro(sin β/β) or R = Rosinc β. This is the single-slit Fraunhofer diffraction pattern.
As a becomes comparable to the wavelength, the diffracted light is
distributed in a broad cone. The first minimum of R occurs when the
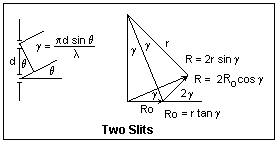
vibration arc closes into a circle, at β = π.Now suppose we have two narrow slits separated by a distance d. The Fraunhofer pattern is two-beam interference, as we already know, and the fringe visibility is unity. The extra distance travelled by the light from the lower slit is d sin θ, so the phase difference is 2πd sin θ/λ = 2γ. The vibration diagram consists of two vectors of length Ro making an angle of 2γ with each other, and R is their vector sum. From the isosceles triangle thus formed, it is simple to see that R = 2Ro cos γ. We can make this more like the single-slit analysis by considering R as the third side of an isosceles triangle with equal sides r and angle 2γ. Then, R = 2r sin γ and Ro = r tan γ, from which we find the same result on eliminating r. We have not included the effect of obliquity on the amplitudes of the interfering waves. This can be done by multiplying by the factor sin β/&beta. Note that each amplitude Ro is the chord of a circular vibration arc.
The condition for bright fringes is cos γ = ±1, or γ = 0, π, 2π, ..., mπ, ... . In terms of θ, this is d sin θ = mλ, which means that there is a whole number of wavelengths in the path difference. m is called the order of the fringe. Each increase of unity in the order means that the amplitude vector rotates through a full circle. This, of course, gives the same triangle (neglecting the decrease in amplitude with obliquity).
 It is not difficult now to leap to the case of a large number N of slits
of spacing d. The vibration curve is a polygon that approximates the
arc of a circle, and the closing side of the polygon is the desired
amplitude R. The angle between each elementary vector and the next is
2γ, so the total angle subtended by R is 2Nγ. If r is the radius of the
circle, then R = 2r sin Nγ, while Ro = 2r sin γ. Therefore, R = Rosin Nγ/sin γ. As γ approaches zero, R = RoNγ/γ = NRo. Therefore, the maximum intensity is Im = N2Io, where Io is the intensity due to a single slit. The same holds for γ = mπ. These are the principal maxima.
The first principal maximum is at θ = 0, whatever the value of λ, but
the positions of the succeeding ones depend on the wavelength. As in the
case of the double slit, the maximum of order m corresponds to m
wavelengths path difference between two successive slits. It is usual to
multiply the expression for the amplitude by the single-slit factor sin
β/β to account for the diffractive spread of the light. In most cases,
the factor (sin β/β)2 in the intensity is at best a rough approximation, since the grooves are not regular slits of width a.
It is not difficult now to leap to the case of a large number N of slits
of spacing d. The vibration curve is a polygon that approximates the
arc of a circle, and the closing side of the polygon is the desired
amplitude R. The angle between each elementary vector and the next is
2γ, so the total angle subtended by R is 2Nγ. If r is the radius of the
circle, then R = 2r sin Nγ, while Ro = 2r sin γ. Therefore, R = Rosin Nγ/sin γ. As γ approaches zero, R = RoNγ/γ = NRo. Therefore, the maximum intensity is Im = N2Io, where Io is the intensity due to a single slit. The same holds for γ = mπ. These are the principal maxima.
The first principal maximum is at θ = 0, whatever the value of λ, but
the positions of the succeeding ones depend on the wavelength. As in the
case of the double slit, the maximum of order m corresponds to m
wavelengths path difference between two successive slits. It is usual to
multiply the expression for the amplitude by the single-slit factor sin
β/β to account for the diffractive spread of the light. In most cases,
the factor (sin β/β)2 in the intensity is at best a rough approximation, since the grooves are not regular slits of width a.This array of slits is called a diffraction grating. A typical grating for visible light has about 15,000 lines per inch, or d = 1690 nm. Now consider an angle θ such that the difference in paths at the extreme ends of the grating is one wavelength. The wavelet from one end of the grating will be 180° out of phase with the wavelet from the middle of the grating, and so they will cancel. The same thing holds for each slit as we move from the top of the middle, so we will have zero intensity. In general, since the path difference in the mth order is Nmλ, and this gives a principal maximum, the angle that gives a path difference Nmλ + λ will also give a zero. Let the breadth of the grating be b = Nd. The width of the beam will be b cos θ, so the angle δ will be given by b cos θ sin δ = λ, or sin δ = λ/(b cos θ). This is surely a very small angle, so δ = λ/(b cos θ) = λ/(Nd cos θ). That is, the principal maxima are very narrow, which makes the grating an excellent spectroscopic tool.
The relation between wavelength, angle and order is given by d sin θ = m&lambda. If the light is incident at an angle i with the normal to the grating, then we must replace sin θ by sin i + sin θ, as is clear from a diagram. Taking the derivative with respect to λ gives d cos θ dθ = m dλ. Replacing dθ by λ/(Nd cos θ), we find that λ/dλ = mN. This is the resolving power of the grating, the ratio of a wavelength to the smallest detectable wavelength difference in its vicinity. We have applied Rayleigh's criterion for resolution, when one maximum falls on the first zero of the other. The same equation gives us the angular dispersion dθ/dλ = m/(d cos θ).
Gratings are made by ruling fine grooves with a diamond point in an aluminium film deposited on a substrate, such as glass. These are, therefore, reflecting gratings. Replica gratings are made by covering the master grating with a film of collodion or plastic, and then stripping it off. These may be transmission gratings, or may be silvered to be reflecting gratings. Gratings may be ruled on a concave mirror, so that lenses are not required for collimation or observation. These are, of course, reflecting gratings. The grooves may be specially shaped to throw light into the angles that will be used. These are blazed gratings, which can give a greatly improved intensity. The ruling must be very accurate to avoid the appearance of spurious lines or ghosts. A periodic error produces the easily-recognized Rowland ghosts that symmetrically accompany a line. More complex errors may create Lyman ghosts that appear singly.
The most common mounting (as it is called) for a plane reflecting grating is the Littrow. The slit S and plate P or other recording medium are placed one above the other at one end. At the other, a good achromatic lens L is placed in front of the grating, which can be rotated to select the wavelength interval received on the plate. The incident and diffracted light trace the same path in opposite directions. A small transmission grating can replace the prism in a spectrometer, where the angles can be accurately measured.
Large concave gratings were once popular for research, and may still be useful. A typical example had a radius of 21 ft.. A point source this distance in front of the grating will produce a beam that is again focused at this point C after reflection from the mirror (the rays are radii). If we draw a circle of a diameter equal to the radius of the mirror, C is on this circle. If a source is at some other point S, b drawing rays and using the law of reflection, its beam is focused at some point P symmetrically to C. Also, diffracted rays from the concave grating will also be focused at a point on this circle. Therefore, if the slit and plate are both located on this circle, spectral lines will be focused on the plate. The circle is called the Rowland circle, after the inventor of the concave grating and an accurate ruling machine. The major disadvantage of this arrangement is that the imaging is very strongly astigmatic, since the mirror is being used off-axis.
In the Rowland mounting shown in the diagram, the grating and plate are mounted at the ends of a beam, the diameter of the Rowland circle apart. The ends of the beam move along the ways at right angles. Since the angle in a semicircle is a right angle, the slit S will also lie on the Rowland circle. The diffracted light is directed normal to the grating, while the angle of incidence can be varied. Henry Augustus Rowland (1848-1901), the first professor of physics at Johns Hopkins University, invented the concave grating, developed ruling machines, and studied the solar spectrum, among other things.
It is easy to use a grating with a student spectrometer. My spectrometer came with a well-mounted 300 lines/mm transmission grating. The collimator and telescope should first be adjusted, as when a prism is used. The grating holder can be placed on the prism table and oriented normal to the collimator axis by eye. The main adjustment that may be required is to make the grating lines parallel to the slit. If the observed spectrum is sharp, this may not be necessary. If it is, rotate the slit horizontal and then examine the spectra formed by a white light as the telescope is swung back and forth. Level the prism table until the spectra are parallel and do not rise or fall. This makes the rulings parallel to the axis of the spectroscope. Now restore the slit to vertical and adjust until the lines are sharp. My grating and holder were well-enough made that this adjustment was not required, so long as the prism table had previously been properly adjusted.
I used a low-pressure Hg discharge as a source, which gives strong blue (435.8 nm), green (546.1 nm) and yellow (577.0 and 579.1 nm) lines. Since the wavelengths are well-known, the experiment can be turned around to measure the grating spacing d. Measure the angle between the zero order and the desired line. One can also measure the wavelength difference between the yellow lines. Use the second or third order for greater accuracy.


No comments:
Post a Comment